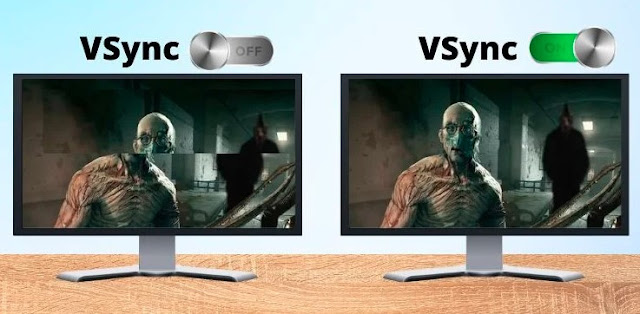
How to Enable V-Sync on Windows. In the dynamic realm of graphics and gaming on Windows, achieving a visually immersive experience is a top priority for enthusiasts. From gaming thrills to multimedia delights, the quality of graphics performance plays a pivotal role in shaping our digital encounters. This guide focuses on a key ingredient for enhancing this experience: Vertical Synchronization, commonly known as V-Sync. As we embark on this journey, we'll unravel the significance of V-Sync, explore its impact on screen tearing, and provide you with a detailed roadmap on how to enable V-Sync on your Windows system. Get ready to unlock the full potential of your graphics hardware and elevate your visual experience to new heights.
What is V-Sync, and Why Does it Matter?
In the realm of graphics technology, V-Sync, short for Vertical Synchronization, stands as a crucial player in the pursuit of a seamless visual experience. At its core, V-Sync is designed to synchronize the frame rate of your graphics card with the refresh rate of your display. This synchronization eliminates a common nuisance known as screen tearing—a phenomenon where two different frames are displayed on the screen simultaneously, causing a visual disjointedness.
The significance of V-Sync becomes apparent when considering its role in creating a smoother, more visually pleasing encounter. By aligning the graphics card's output with the display's refresh rate, V-Sync eradicates the occurrence of screen tearing, providing a cohesive and uninterrupted visual flow. Whether you're an avid gamer aiming for precision or a multimedia enthusiast seeking optimal clarity, understanding and enabling V-Sync on your Windows system is a key step towards a more gratifying and immersive graphics experience.
Step-by-Step Guide: Enabling V-Sync on Windows
A. Navigate to Graphics Settings
Open Settings from the Start menu:
- Begin by clicking on the Start menu in the lower-left corner of your screen.
- Select "Settings" from the menu to access the Windows Settings panel.
Access Display settings and Graphics settings:
- Within the Settings panel, navigate to the "System" category.
- Choose "Display" and scroll down to find and click on "Graphics settings."
B. Adjust Graphics Performance Preferences
Choose the application for V-Sync:
- Under "Choose an app to set preference," select the specific application or game for which you want to enable V-Sync.
Access Options for the selected application:
- Click on "Options" to open a menu where you can customize graphics settings for the chosen application.
C. Enable Hardware-Accelerated GPU Scheduling
Navigate to Graphics specifications:
- Scroll down within the Graphics settings panel to find the "Graphics specifications" section.
Toggle Hardware-accelerated GPU scheduling ON:
- Locate the "Hardware-accelerated GPU scheduling" option and switch it to the ON position to optimize GPU performance.
D. Access Graphics Control Panel
Right-click on desktop and select Graphics Options:
- Close the Settings panel and right-click on your desktop.
- Choose "Graphics Options" from the context menu.
Choose Graphics Properties:
- In the Graphics Options menu, select "Graphics Properties" to open the Graphics Control Panel.
E. Enable V-Sync
Locate V-Sync option in Graphics Control Panel:
- Within the Graphics Control Panel, find the V-Sync option. The exact location may vary depending on your graphics card.
Fine-tune additional settings for optimal performance:
- Adjust any additional settings available to tailor your graphics experience according to your preferences.
By following these step-by-step instructions, you'll empower yourself to seamlessly enable V-Sync on your Windows system, ensuring a more refined on How to Enable V-Sync on Windows and a tear-free visual experience across various applications and games.
Expert Tips for Optimal V-Sync Configuration
A. Monitor Your Frame Rate
Utilize Third-Party Monitoring Tools:
- Employ external tools like MSI Afterburner or FRAPS to monitor your system's frame rate.
- Ensure that V-Sync is effectively capping the frame rate to match your display's refresh rate.
Adjust Graphics Settings Accordingly:
- Based on the monitored frame rate, fine-tune in-game graphics settings or system-level options to maintain a balance between performance and visual quality.
B. Experiment with In-Game Settings
Explore In-Game V-Sync Options:
- Some games have their own V-Sync settings within their graphics options.
- Experiment with both in-game V-Sync and system-level V-Sync to determine the optimal configuration for each title.
Consider Triple Buffering:
- In situations where standard double buffering may introduce input lag, explore the possibility of enabling triple buffering in certain games for smoother performance.
C. Update Graphics Drivers
Regularly Check for Driver Updates:
- Keep your graphics drivers up-to-date by checking for the latest releases from your GPU manufacturer (NVIDIA, AMD, or Intel).
- Updated drivers often include optimizations for V-Sync and can improve overall graphics performance.
Perform Clean Installations:
- Consider performing clean installations when updating drivers to ensure a fresh configuration and minimize potential conflicts.
D. Consider Adaptive Sync Technologies
Explore Adaptive Sync Options:
- If your monitor supports it, consider using Adaptive Sync technologies like NVIDIA G-Sync or AMD FreeSync for an enhanced and dynamically adjusted refresh rate.
Verify Monitor Compatibility:
Confirm that your monitor is compatible with the selected Adaptive Sync technology before enabling it for the best results.
By incorporating these expert tips into your V-Sync configuration strategy, you can not only eliminate screen tearing but also fine-tune your graphics settings to achieve an optimal and personalized visual experience on your Windows system. Experiment with these recommendations to strike the perfect balance between performance and visual quality in your favorite applications and games.

